Welcome to WitVPN
Full source code for a production-ready VPN app — Android client, admin dashboard, Firebase backend. Built with Kotlin, React, TypeScript. Ready to reskin, rebrand, and ship.
bash setup.sh (macOS/Linux) or double-click setup.bat (Windows) at the package root. Answer the prompts. That's it.
What you get
Android app — 01-android-app/
- Kotlin, MVVM, Hilt, Coroutines, Retrofit, Room, Glide
- Bundled OpenVPN (GPL-2.0)
- Google Sign-In + Firebase Auth + Firestore
- Google AdMob (banner + interstitial, premium-gated, frequency-capped)
- Google Play Billing Library 7.x (subscriptions + one-time)
- reCAPTCHA Enterprise + R8 minification
VPN Server — 03-vpn-server/
- Production-grade OpenVPN install script (angristan/openvpn-install, MIT)
- Works on Debian/Ubuntu/CentOS/Fedora/Rocky/Alma/Arch
- 5-minute setup on a $4/mo Linux VPS (DigitalOcean, Hetzner, Vultr…)
- Generates a ready-to-upload
.ovpnfile the Admin Dashboard accepts - Add/revoke users via interactive menu on re-runs
Admin Dashboard — 02-admin-dashboard/
- Vite + React + TypeScript + Tailwind
- Firebase Auth (Google login) + Firestore CRUD
- Manage servers, configs, users, admin roles
- Cloud Function: auto-assigns admin custom claims
- Deploys to Firebase Hosting in one command
How long & how much?
| Step | Time | Cost |
|---|---|---|
| Install prerequisites (Node, JDK, Android Studio) | 30–60 min | Free |
| Create Firebase project + enable services | 15–20 min | Free (Spark plan) |
Run setup.sh / setup.bat | 5–10 min | Free |
| First Android build | 5–15 min | Free |
| Google Play Console account | 1–14 days (review) | $25 one-time |
| AdMob account | 1–7 days (review) | Free |
1. Prerequisites
Install these first. The setup script will verify them and guide you if anything is missing.
# Install Homebrew if you don't have it
/bin/bash -c "$(curl -fsSL https://raw.githubusercontent.com/Homebrew/install/HEAD/install.sh)"

# Node.js 20
brew install node@20

# JDK 17
brew install --cask temurin@17

# Android Studio (~8GB)
brew install --cask android-studio

# (Optional) Firebase CLI — only for deploy
npm install -g firebase-tools
Download installers:
- Git for Windows (includes Git Bash — required for
setup.sh) - Node.js 20 LTS
- JDK 17 (Temurin)
- Android Studio
After Node is installed, open PowerShell and run:
npm install -g firebase-tools # optional, for deploy# Node.js 20 (Debian/Ubuntu)
curl -fsSL https://deb.nodesource.com/setup_20.x | sudo -E bash -
sudo apt install -y nodejs
# JDK 17
sudo apt install -y openjdk-17-jdk
# Android Studio — download from https://developer.android.com/studio
# Extract to ~/android-studio and run bin/studio.sh
# (Optional) Firebase CLI
sudo npm install -g firebase-toolsVerify installation
node -v      # expect v18+ (v20+ preferred)
npm -v       # expect 9+
java -version # expect 17
# Android Studio: launch it once to finish SDK setup
2. Create your Firebase project
One Firebase project is shared by both apps. Go to console.firebase.google.com and follow the steps.
Create a new project
Click Add project → name it (e.g., witvpn-prod) → disable Analytics if you don't need it → Create project.
Enable authentication providers
Authentication (left sidebar) → Get started → Sign-in method tab. Enable all three providers the Android app uses:
- Google — set support email → Save
- Email/Password — toggle Enable → Save
- Anonymous — toggle Enable → Save
The Admin Dashboard only uses Google; the other two are for the Android app's login flow.
Create Firestore database
Firestore Database → Create database → Start in production mode → choose region (pick one close to your users).
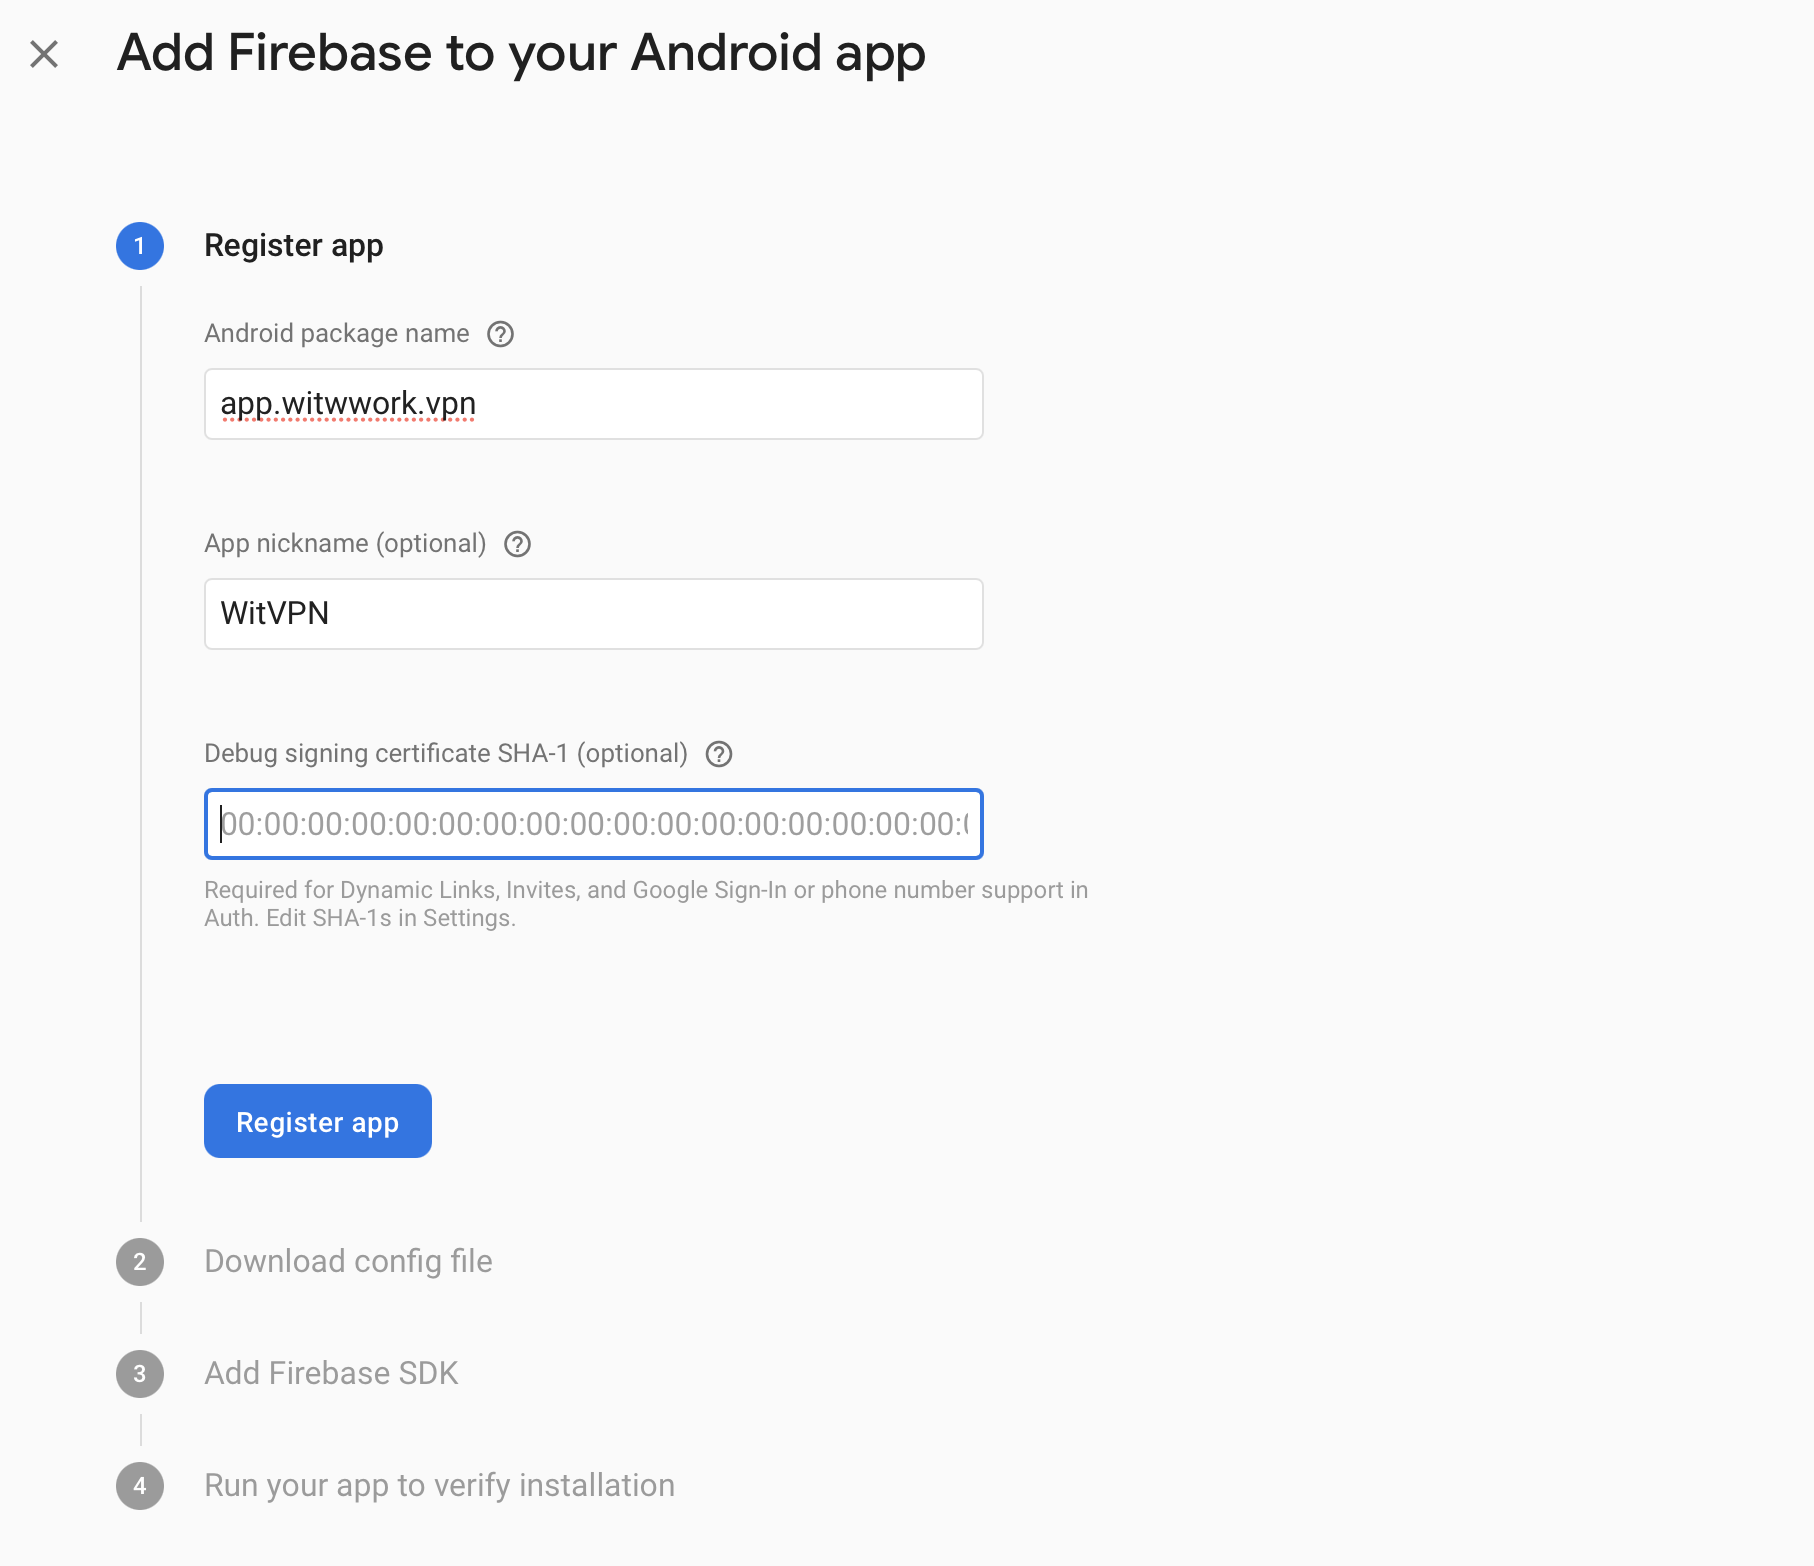
Register the Android app
Project Settings (gear icon) → General tab → Your apps → Android icon.
- Package name:
com.wit.witvpn(or your own — remember what you entered) - App nickname: anything
- SHA-1: you can add this later after generating your keystore
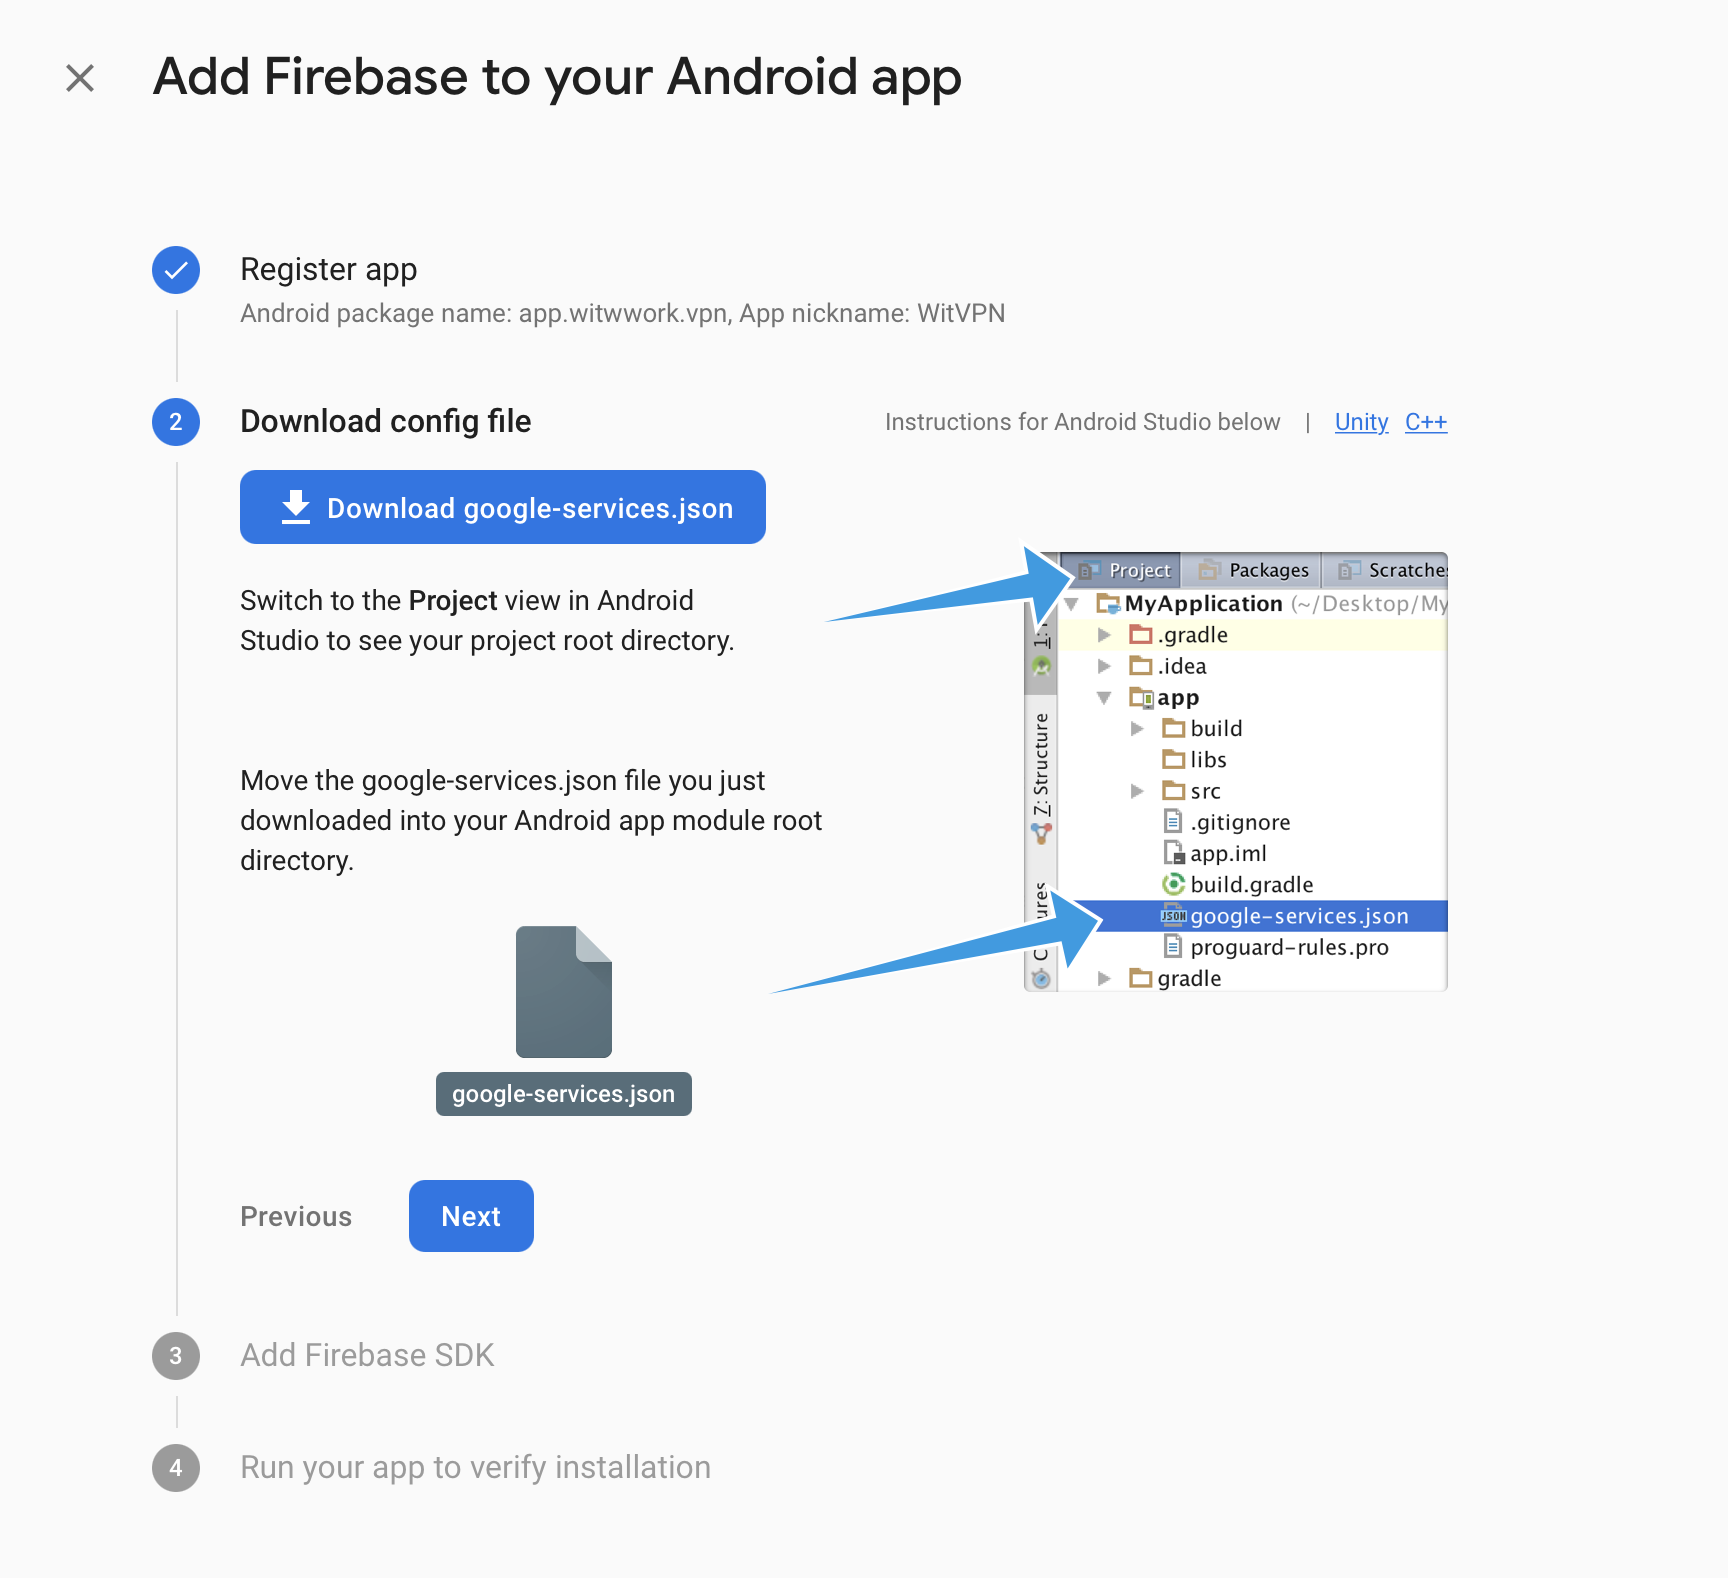
Click Register app → Download google-services.json. Save it somewhere you'll find later.
After clicking Register, you'll be prompted to download google-services.json — drop it into 01-android-app/app/:
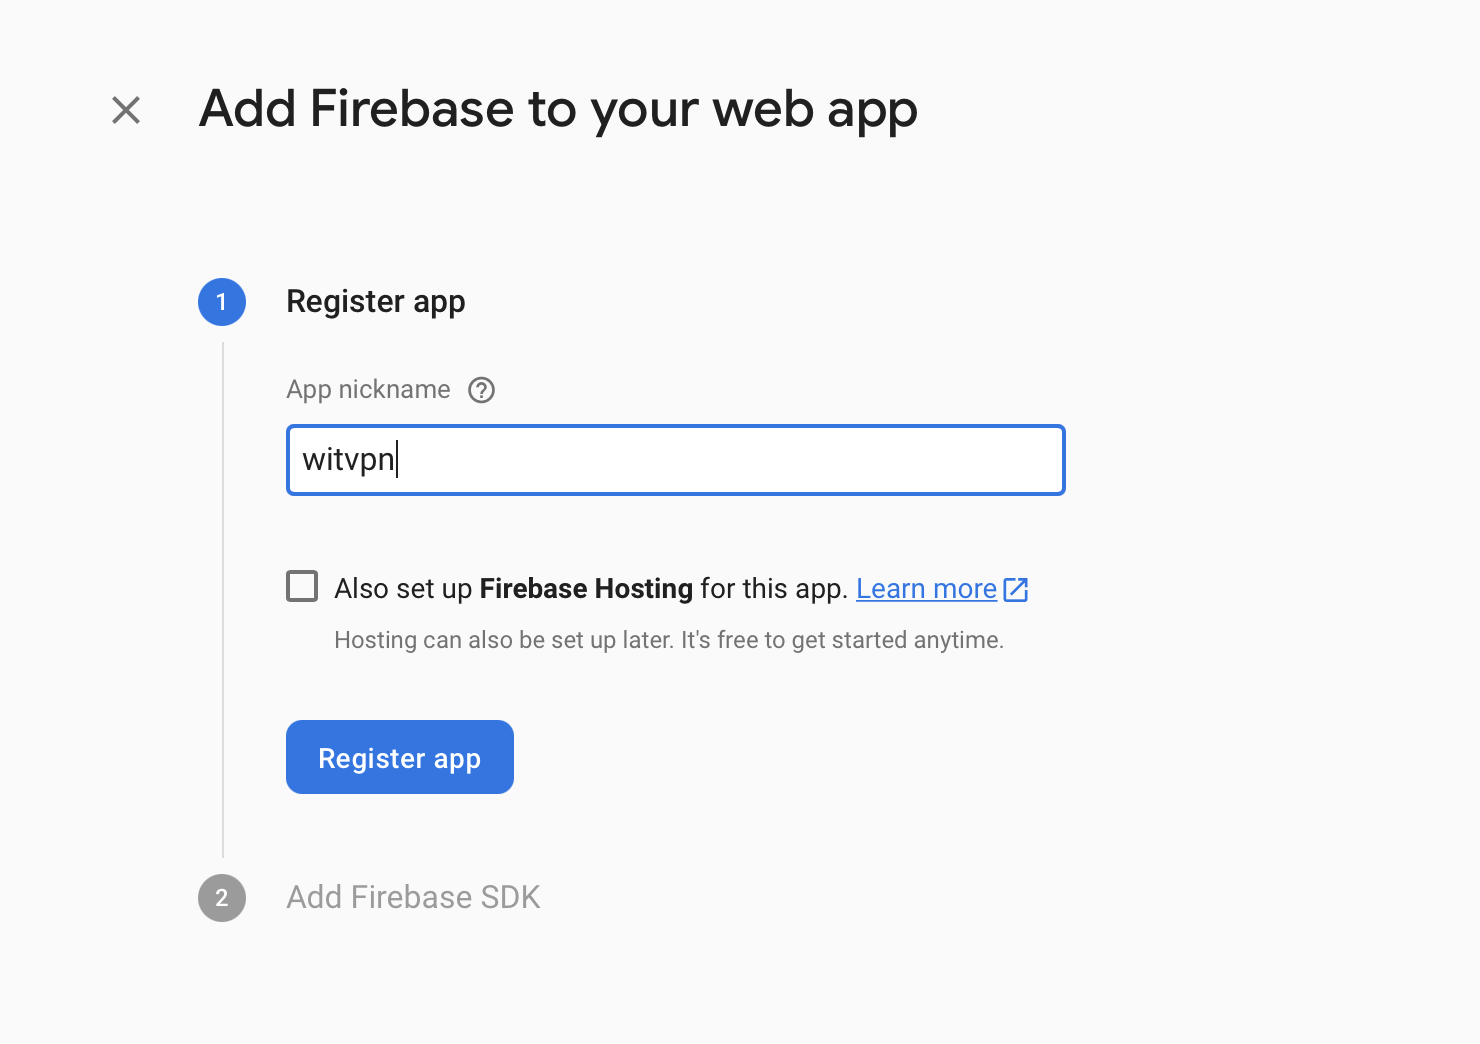
Register the Web app (for the Admin Dashboard)
Same screen → Add app → Web (</> icon) → nickname it → Register app.
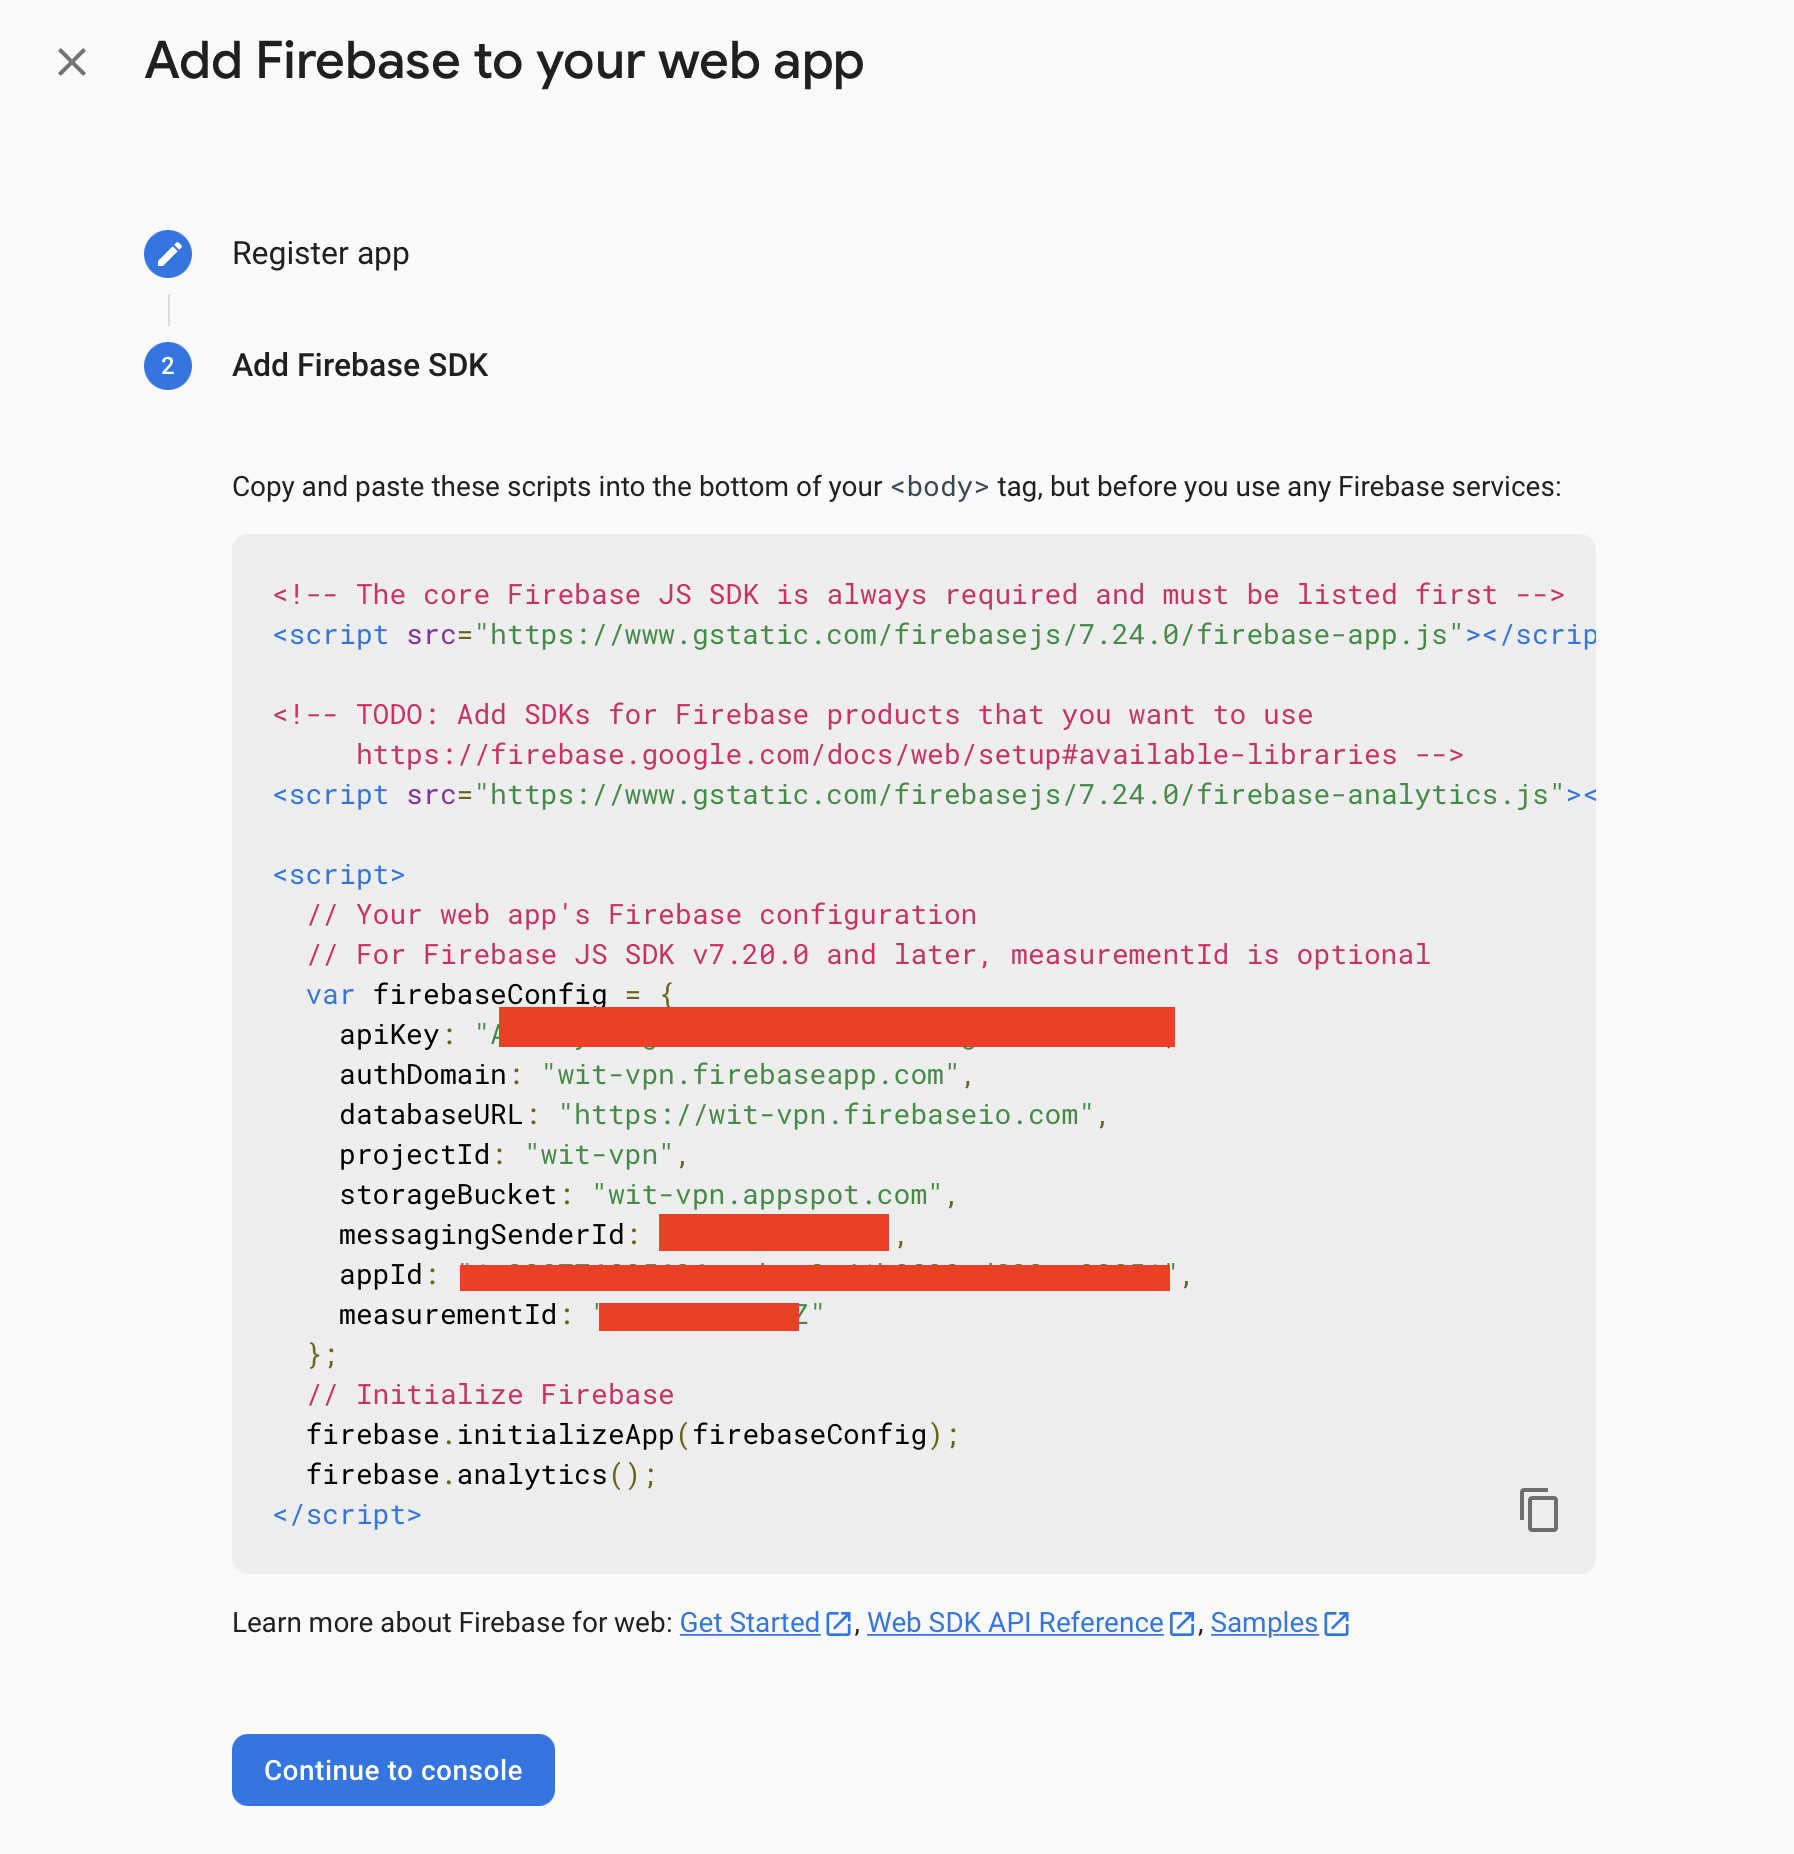
Firebase shows you a config object with 7 values:
const firebaseConfig = {
  apiKey: "AIza...",
  authDomain: "your-project.firebaseapp.com",
  projectId: "your-project",
  storageBucket: "your-project.appspot.com",
  messagingSenderId: "123...",
  appId: "1:123:web:abc...",
  measurementId: "G-..."      // optional
};
Keep this tab open — you'll paste these values into the Admin setup script.
After registering, the SDK config values appear:
Generate a service-account key
Project Settings → Service accounts tab → Generate new private key → confirm the scary warning → a JSON file downloads.
Rename it to serviceAccountKey.json. You'll place it at 02-admin-dashboard/serviceAccountKey.json during setup.
serviceAccountKey.json has full admin access to your Firebase project. Never commit it to git. Never share it. The package's .gitignore already blocks it.
3. Spin up an OpenVPN server
Your Android app needs at least one OpenVPN server to connect to. The bundled angristan/openvpn-install script (MIT, in 03-vpn-server/) takes a fresh Linux VPS and turns it into a working server in 5 minutes.
Rent a Linux VPS
Cheapest tier is plenty for ~30 concurrent users. Pick the region you want the exit IP in.
| Provider | Tier | Price | Notes |
|---|---|---|---|
| Hetzner | CX11 | €4.51/mo | Best price/perf, EU only |
| DigitalOcean | Basic Droplet | $4/mo | Easiest UX, global |
| Vultr | Cloud Compute | $5/mo | Many regions |
| Oracle Cloud | Always Free | $0 | 4 vCPU + 24GB RAM, signup is strict |
Distribution: Debian 12 or Ubuntu 24.04. KVM virtualization (avoid OpenVZ — TUN module won't work).
Upload & run the script
# from your laptop
scp 03-vpn-server/openvpn-install.sh root@YOUR_VPS_IP:/root/

# then SSH in
ssh root@YOUR_VPS_IP
chmod +x openvpn-install.sh
./openvpn-install.sh
Answer ~10 prompts. Defaults are good. Recommended overrides:
- Protocol: UDP (faster, what the Android app uses)
- DNS: Cloudflare or Google
- Compression: no (security best practice — VORACLE attacks)
- Password-protect client: no (the Android app needs to auto-connect)
Grab the .ovpn file
The script writes the client config to /root/<name>.ovpn. Download it to your laptop:
scp root@YOUR_VPS_IP:/root/default.ovpn .Keep this file — you'll upload it via the Admin Dashboard in Step 7 (Populate Firestore).
.ovpn files → 3 docs in the Servers Firestore collection.
Full reference + troubleshooting: 03-vpn-server/SETUP.md.
4. Set up the Android app
Open a terminal in the extracted package root.
cd 01-android-app
bash setup.sh --build
# Windows: double-click setup.bat, or run `setup.bat` from cmd
The script will:
- Check Node, JDK 17, Android SDK — and guide you to install anything missing.
- Ask you to place
google-services.jsonatapp/google-services.json(from Firebase Step 4). - Prompt for: Firebase Android config, Google Web Client ID, AdMob App ID + ad unit IDs, Play License Key, Envato purchase code (optional).
- Generate a release keystore (3 short questions — see below).
- Run
./gradlew bundleRelease— output:app/build/outputs/bundle/release/app-release.aab.
What is a keystore and what do I type?
A keystore is a file Android uses to digitally sign your app. The script runs keytool and asks:
- Full name — your name or your company name
- Organization — your company (or your own name again)
- Country code — 2 letters, e.g.
US,VN,GB - Passwords — pick something and remember it. Min 6 chars.
None of this is shown to end users. The keystore file is saved to app/key/release.jks.
release.jks or forget the password, you can never again push updates to the same app on Play Store. Store a copy somewhere safe (1Password, encrypted drive, etc.).
Where do I get Firebase Android values?
Open Firebase Console → Project Settings → General → Your apps → Android app. The script asks for:
- Project ID — e.g.
witvpn-prod - Web Client ID (for Google Sign-In) — same screen, under the Google provider settings. Looks like
123-abc.apps.googleusercontent.com.
Where do I get AdMob ad-unit IDs?
admob.google.com → Apps → your app (create one if needed) → Ad units. Create one Banner and one Interstitial. IDs look like ca-app-pub-XXXXXXXXXXXXXXXX/YYYYYYYYYY.
The App ID (different from unit ID) looks like ca-app-pub-XXXXXXXXXXXXXXXX~YYYYYYYYYY (tilde, not slash).
Where do I get the Play Billing License Key?
Google Play Console → your app (create a draft if you haven't) → Monetize → Licensing. Copy the Base64 key (starts with MII...).
If your app is still in draft and you haven't published yet, you can leave this blank — the setup script accepts an empty value and you can fill it later in buildSrc/src/main/kotlin/Config.kt.
5. Set up the Admin Dashboard
cd 02-admin-dashboard
bash setup.sh --dev
# Windows: setup.bat
The script will:
- Check Node & npm.
- Prompt for your Firebase Web SDK config (from Firebase Step 5 — not the Android one!).
- Write
.envand.firebaserc. - Ask you to place
serviceAccountKey.jsonat the project root (from Firebase Step 6). - Run
npm install. - Start the Vite dev server at http://localhost:5173.
google-services.json file. If you paste Android values into Admin, the dashboard will show a blank page.
6. Create your first admin user
After you've signed into the dashboard once with Google (so Firebase Auth has your UID), run:
cd 02-admin-dashboard
npx tsx scripts/setAdminRole.ts your@email.com
This sets a admin: true custom claim on your user. Sign out of the dashboard and back in — admin-only routes unlock.
serviceAccountKey.json02-admin-dashboard/serviceAccountKey.json exists first.
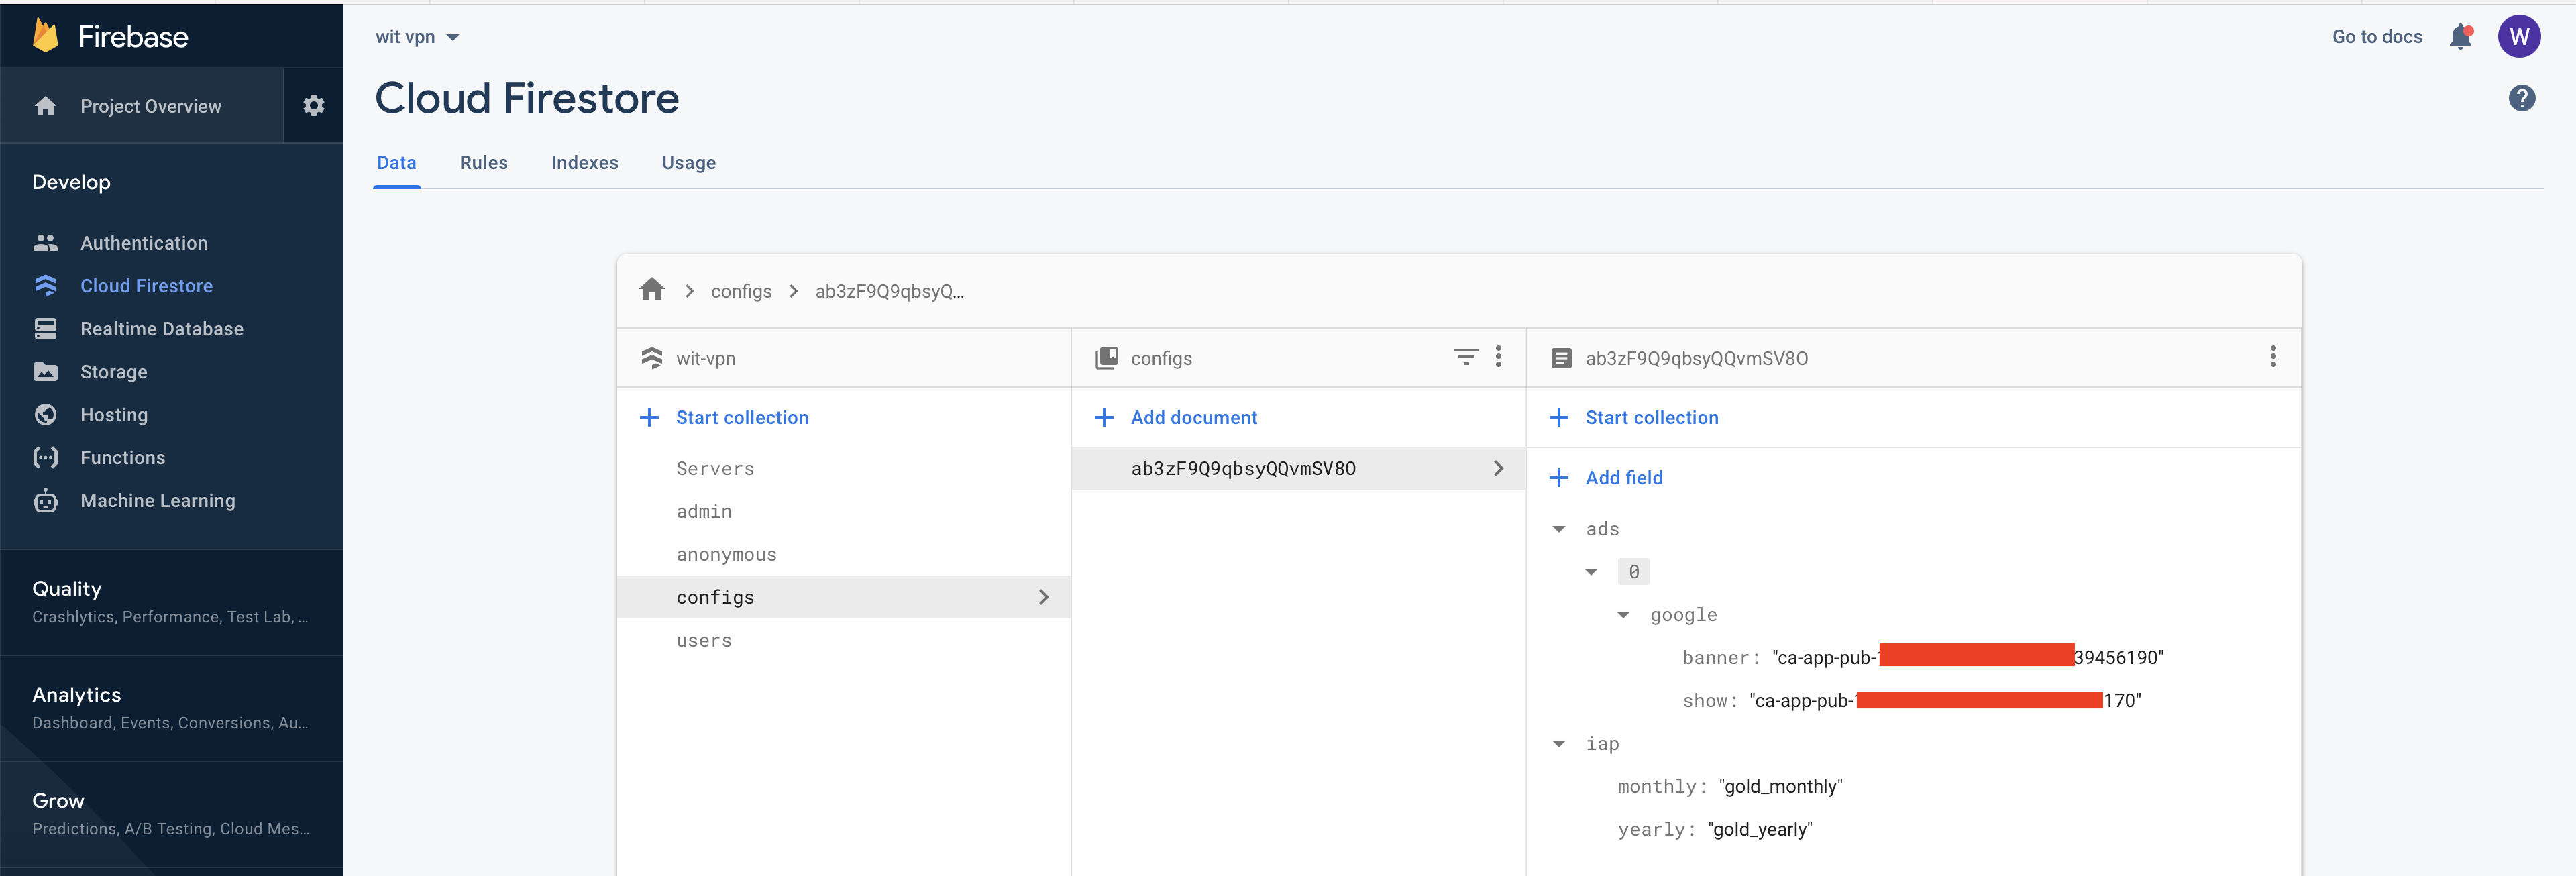
7. Populate Firestore
The Android app reads Servers and configs from Firestore. Easiest path: use the Admin Dashboard UI — open Servers → Add Server, fill in country/IP/premium flag, then upload the .ovpn file you got from Step 3. The dashboard base64-encodes it for you.
Below is what the same data looks like inside Firebase Console, in case you want to seed it manually before the dashboard is up.
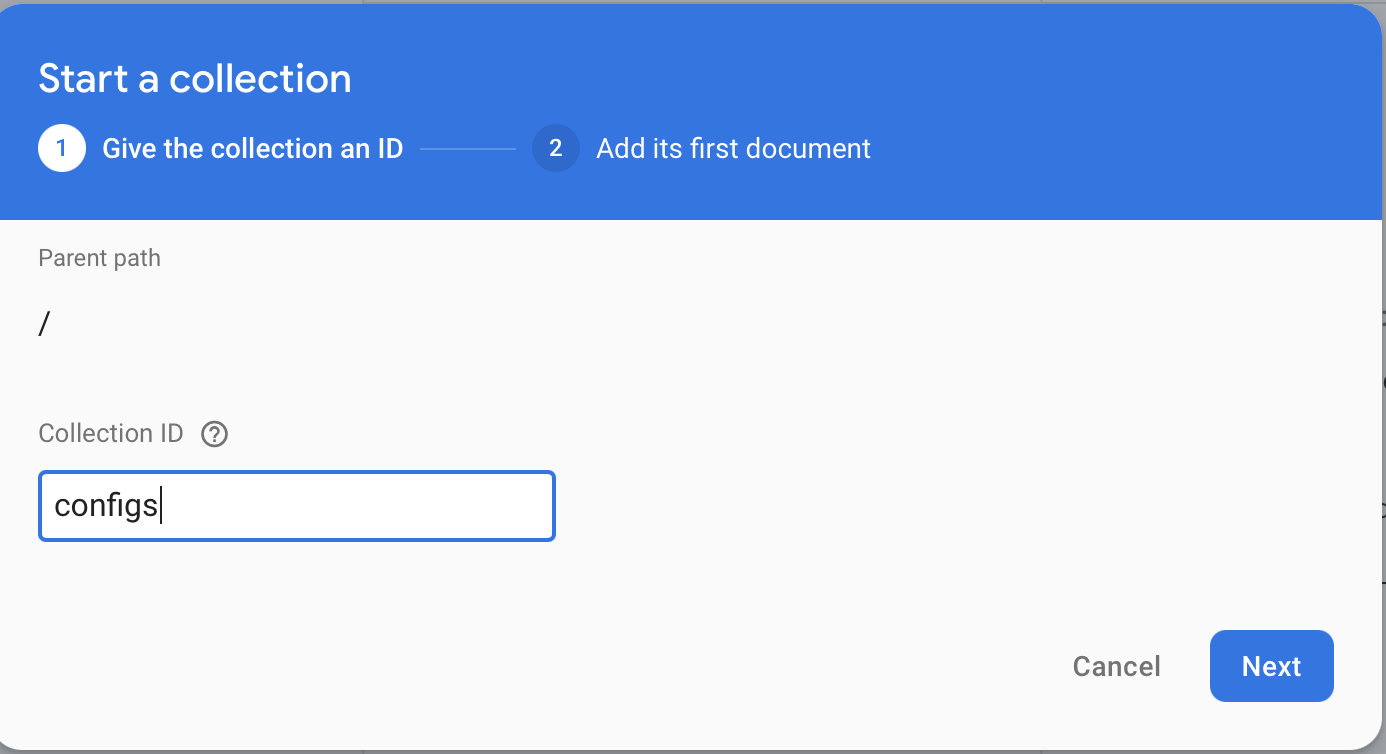
Create the configs collection
Click Start collection at the root of the database, set Collection ID to configs:
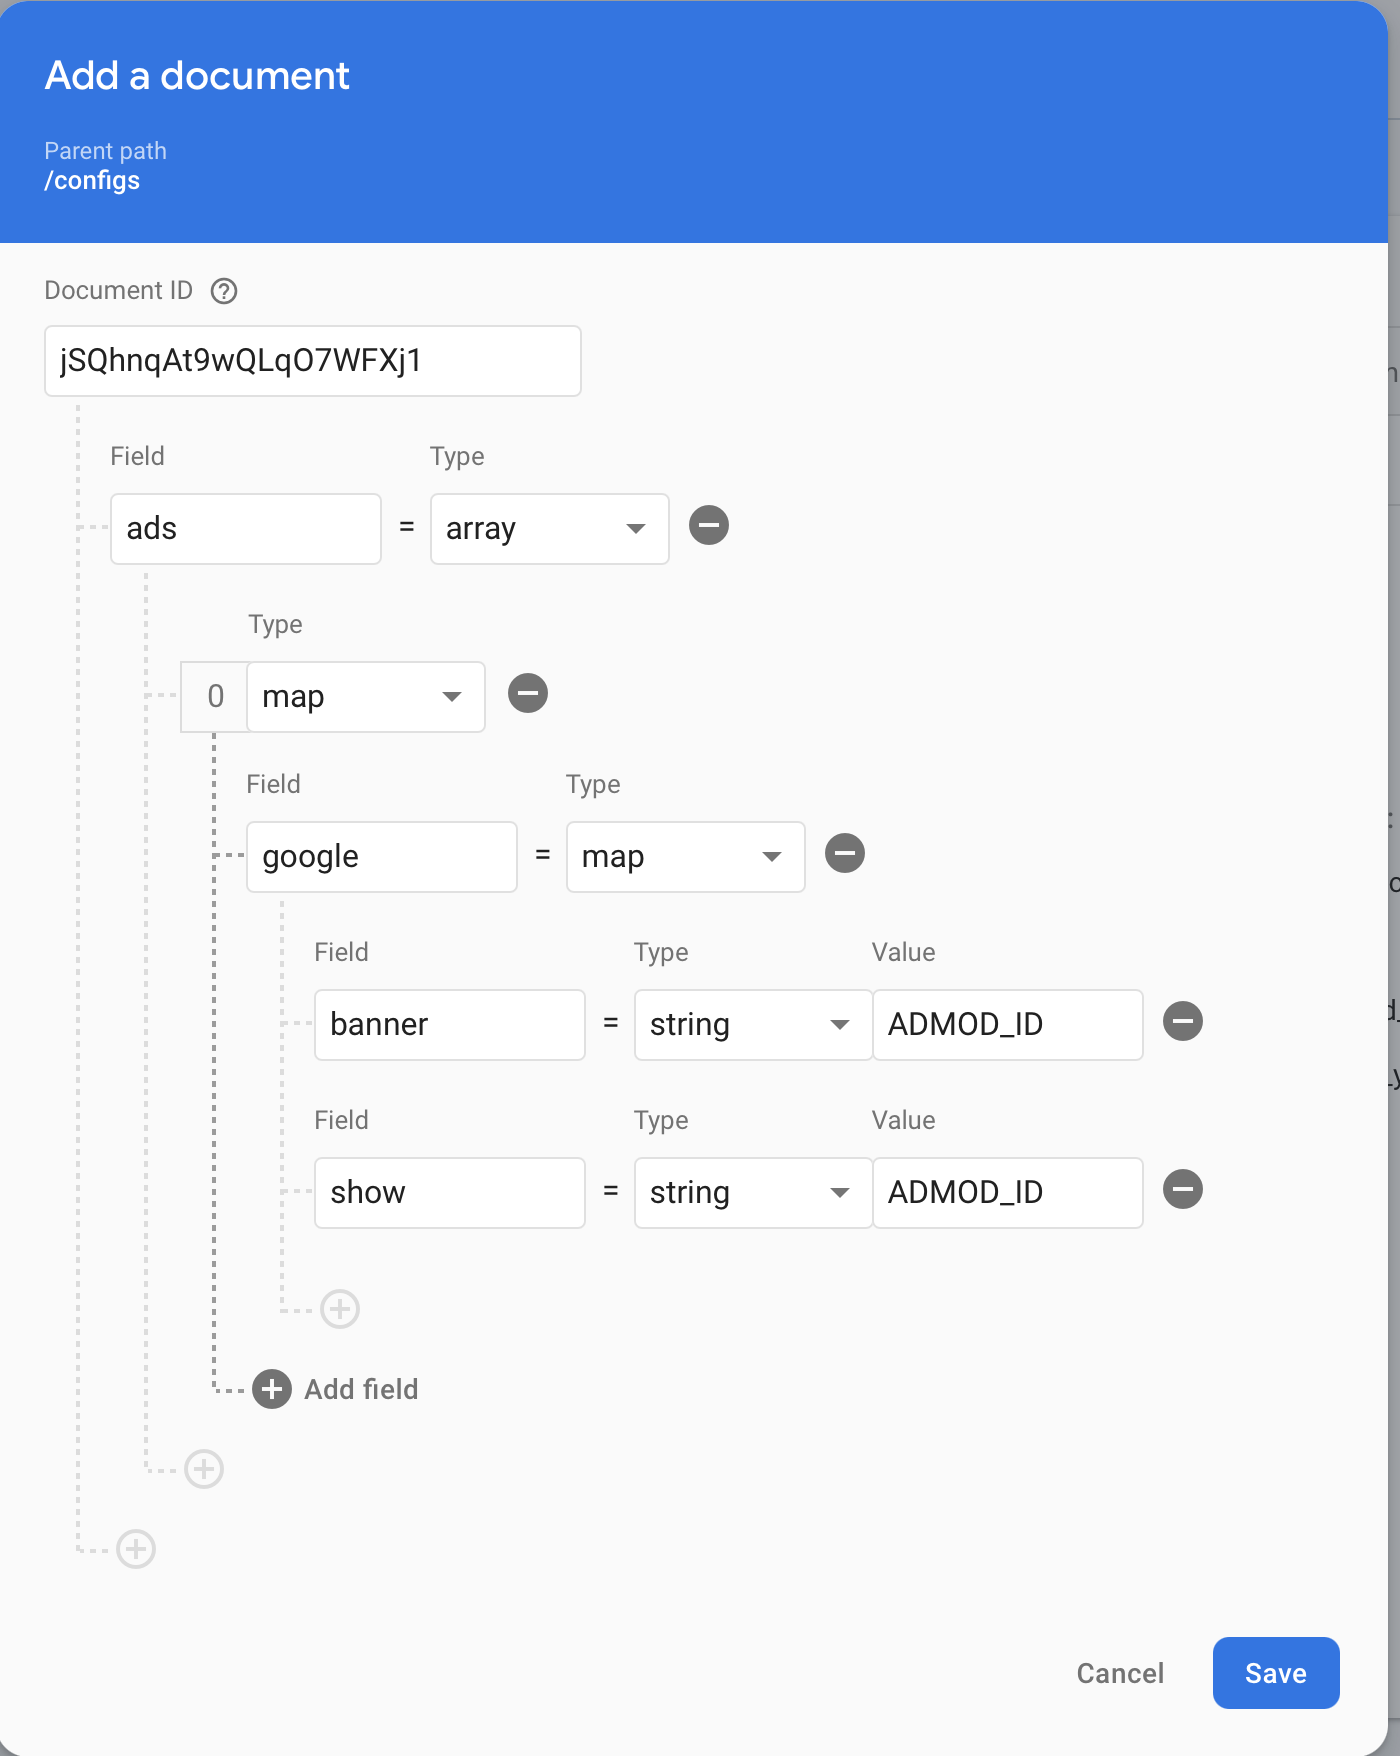
Inside the document, add an ads array of maps. Each map has a google sub-map with your AdMob IDs:
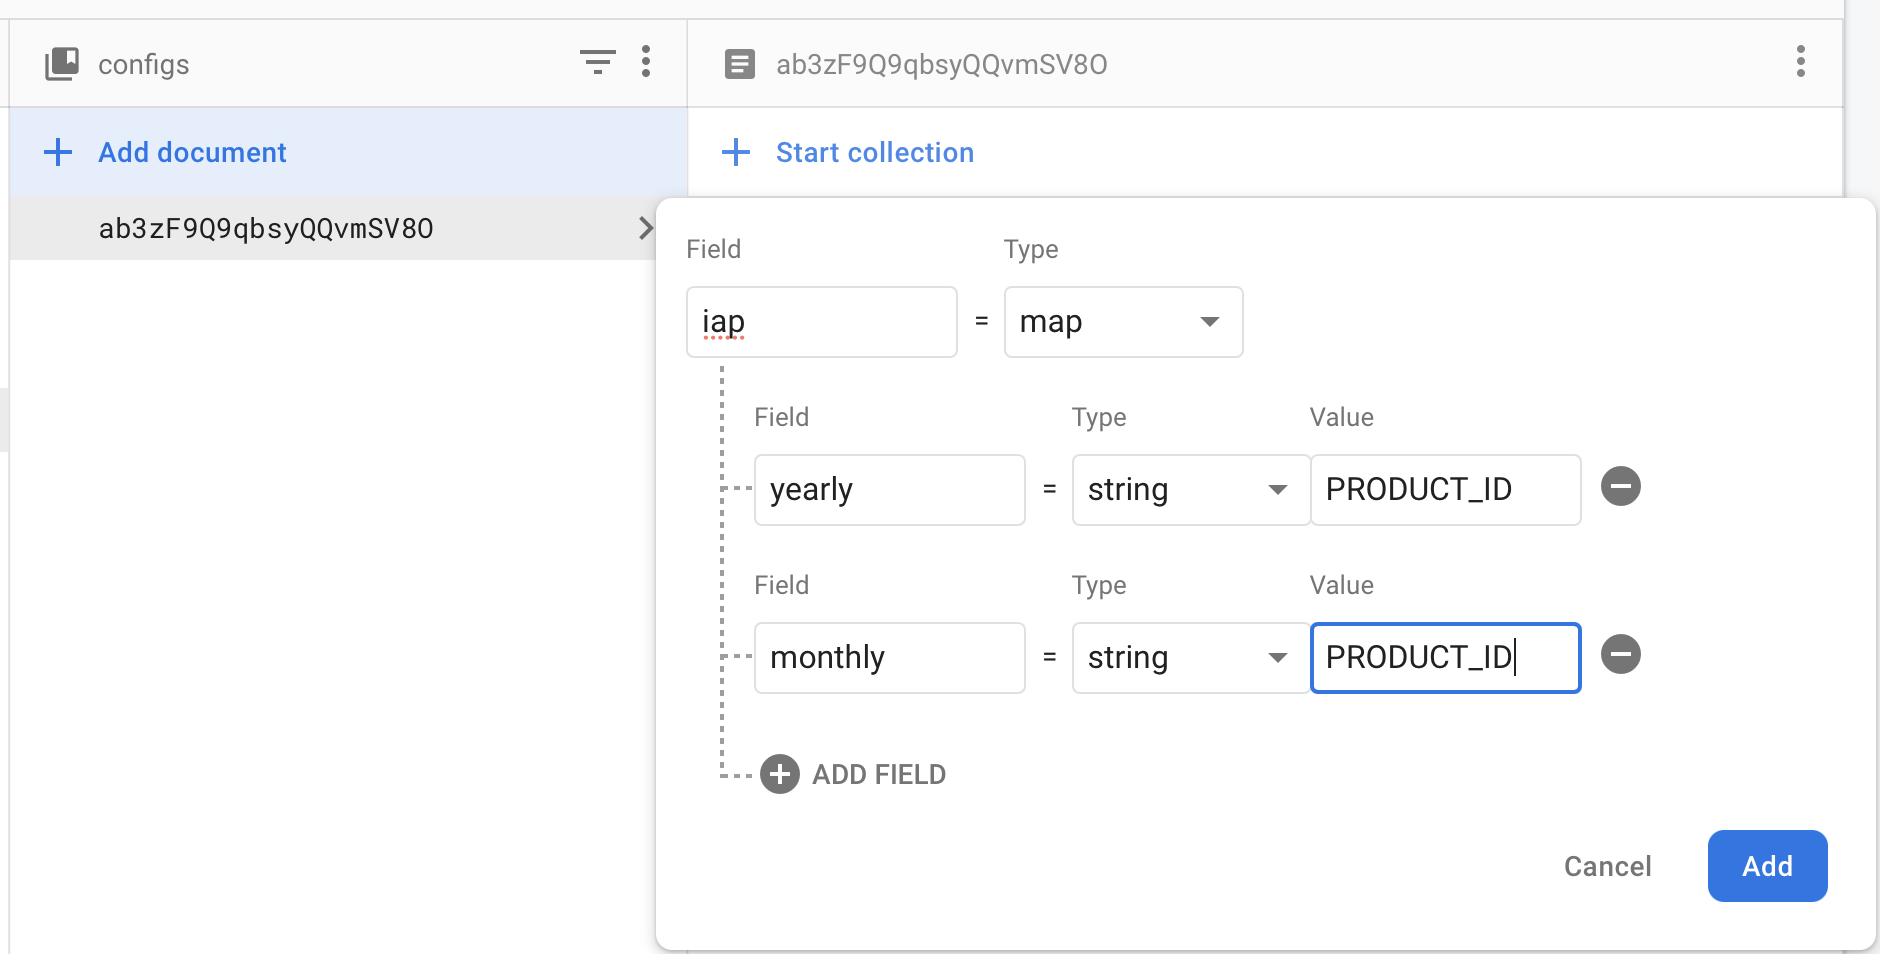
Then add the iap map with your subscription product IDs from Play Console:
Composite index for Servers
The Android app filters Servers by status + premium simultaneously, which Firestore needs an index for. Go to Indexes tab → Add index:
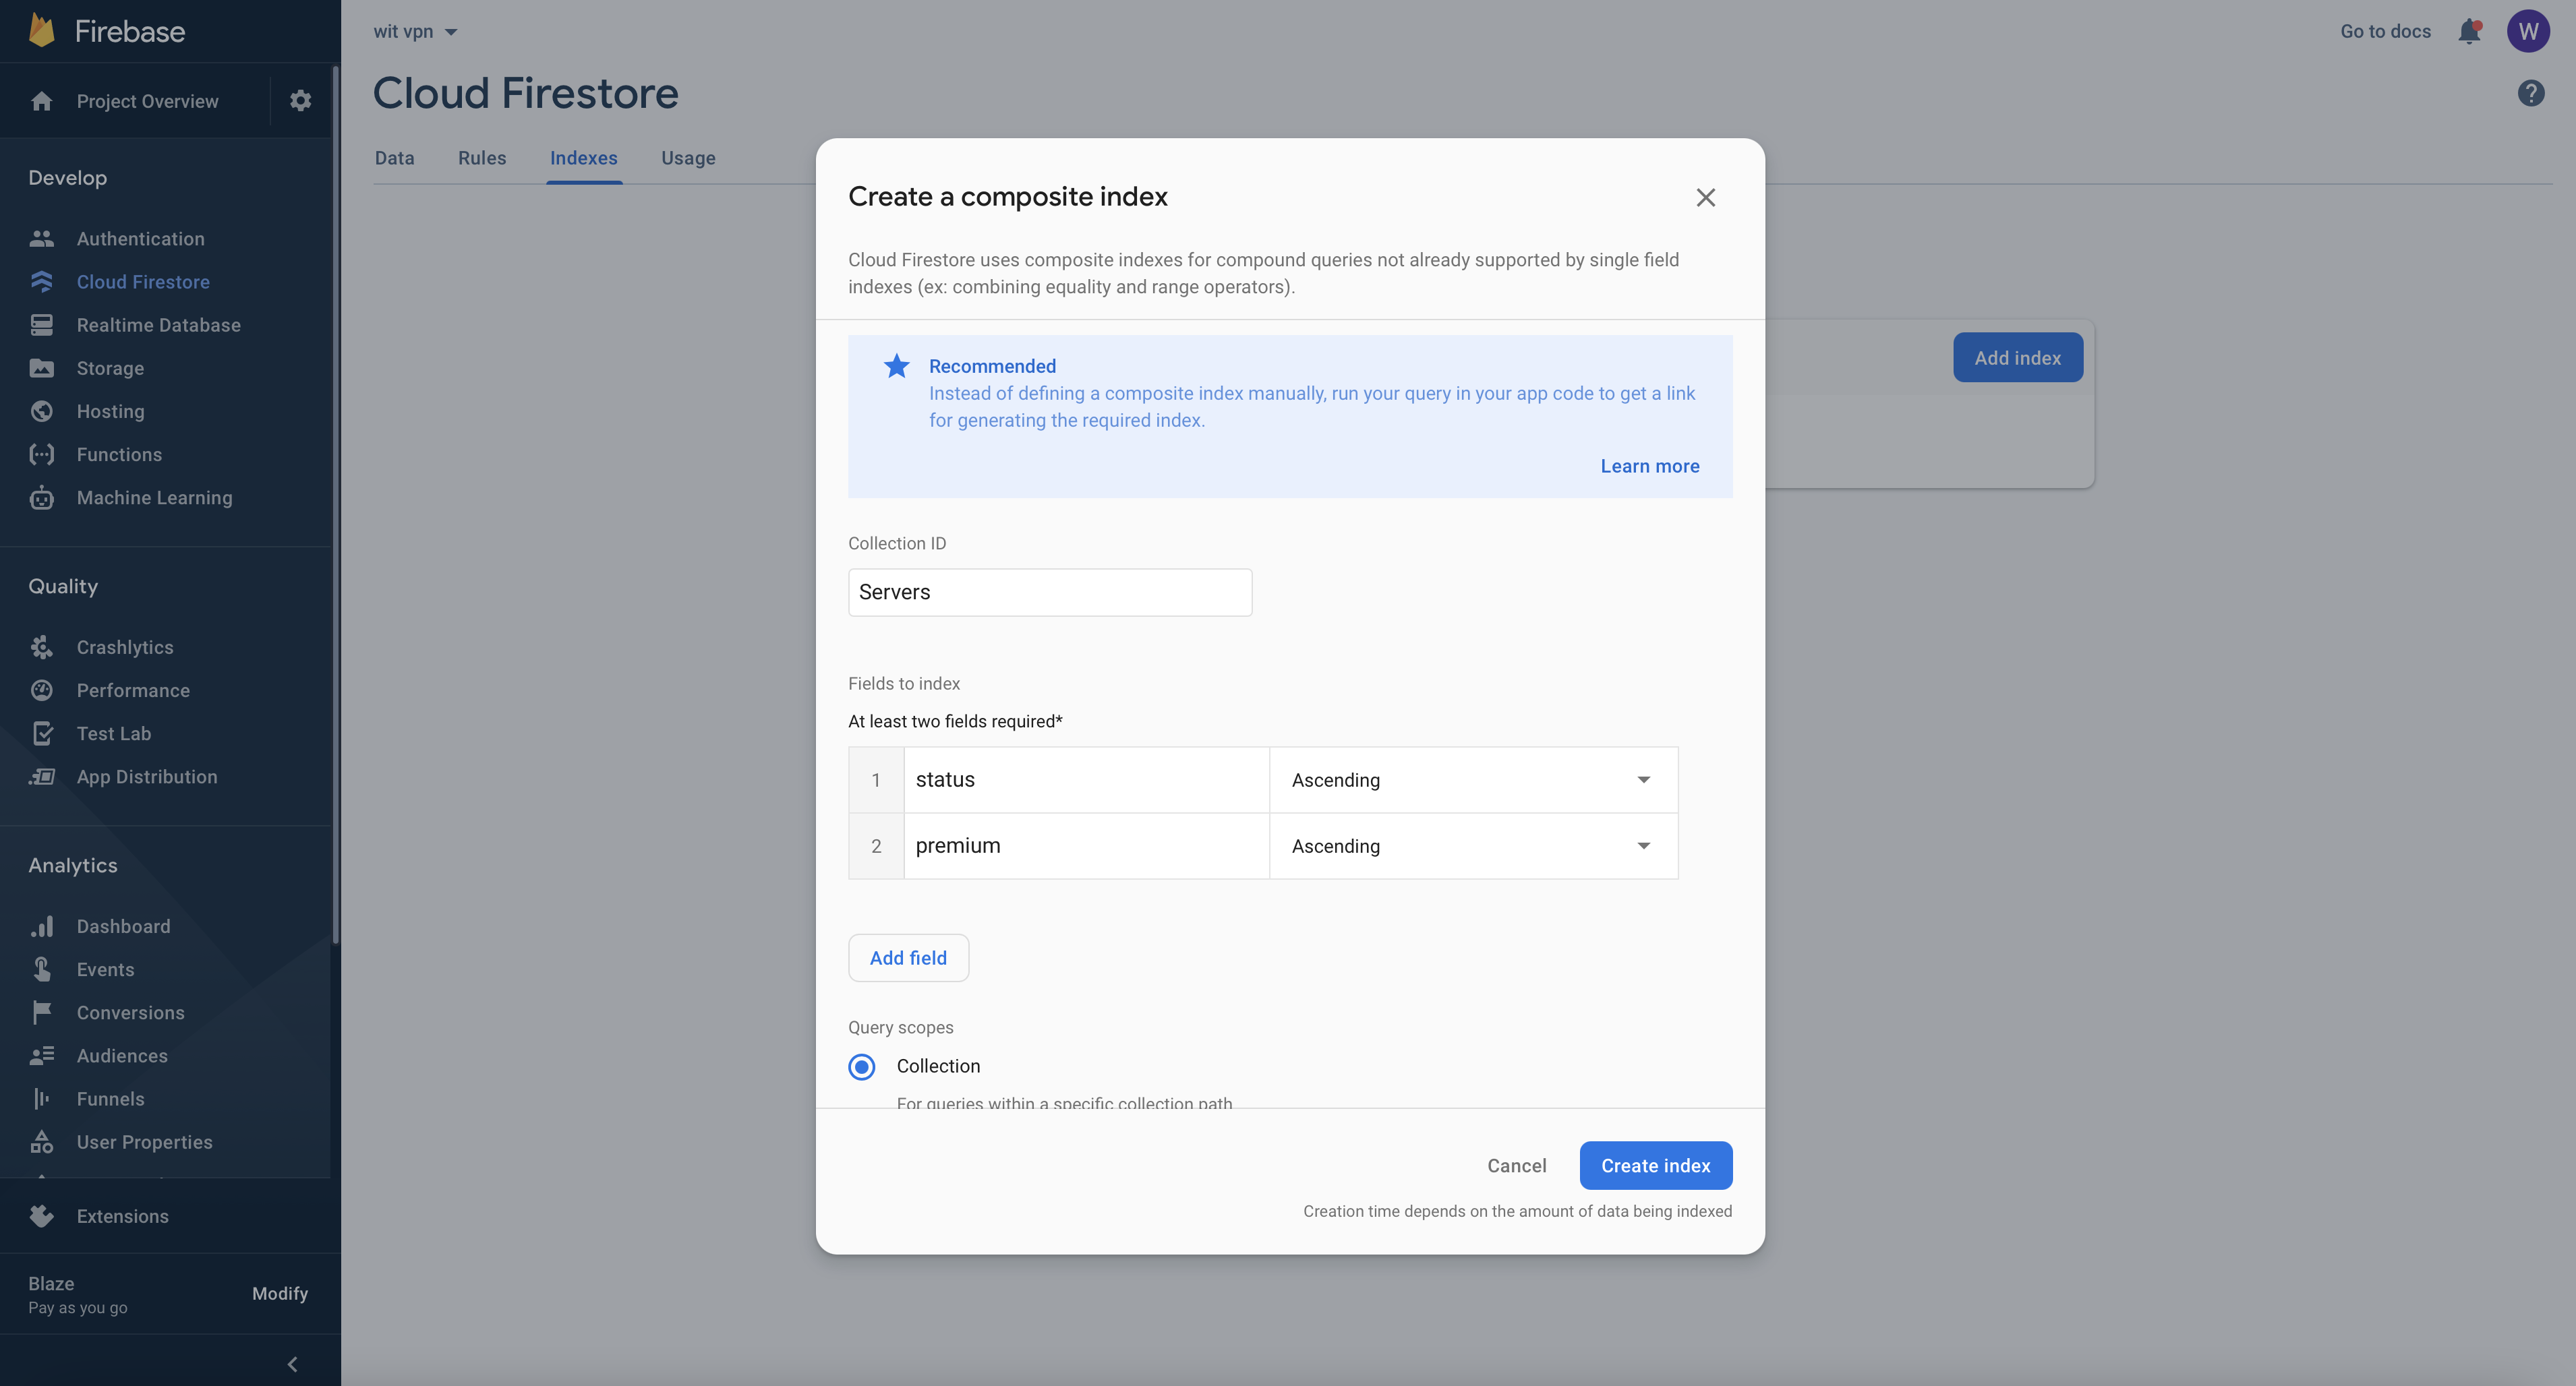
Collection ID: Servers · Fields: status Ascending, premium Ascending · Query scope: Collection. Save and wait ~1 minute for the index to build.
Required fields — Servers collection
| Field | Type | Example |
|---|---|---|
country | string | United States |
countryCode | string (2-letter lowercase) | us |
state | string | California |
ipAddress | string | 192.168.1.1 |
ovpn | string (base64-encoded .ovpn config) | (long string) |
ovpnName | string | us-california.ovpn |
premium | boolean | true / false |
recommend | boolean | true / false |
status | boolean | true (enabled) / false |
8. Deploy
Android app → Google Play Store
- Log in to play.google.com/console ($25 one-time if first time).
- Create a new app → choose defaults → fill required policy questionnaires.
- Release → Production → Create new release → upload
app-release.aab. - Fill store listing (icon, screenshots, description, privacy policy URL).
- Submit for review. First review is 1–7 days.
Admin Dashboard → Firebase Hosting
cd 02-admin-dashboard
firebase login              # first time only
npm run build
firebase deploy --only hosting
# optional — only needed for the onAdminCreated trigger
firebase deploy --only functions
The firebase.json shipped in 02-admin-dashboard/ already wires up build/ as the public directory and rewrites all routes to index.html (SPA mode):
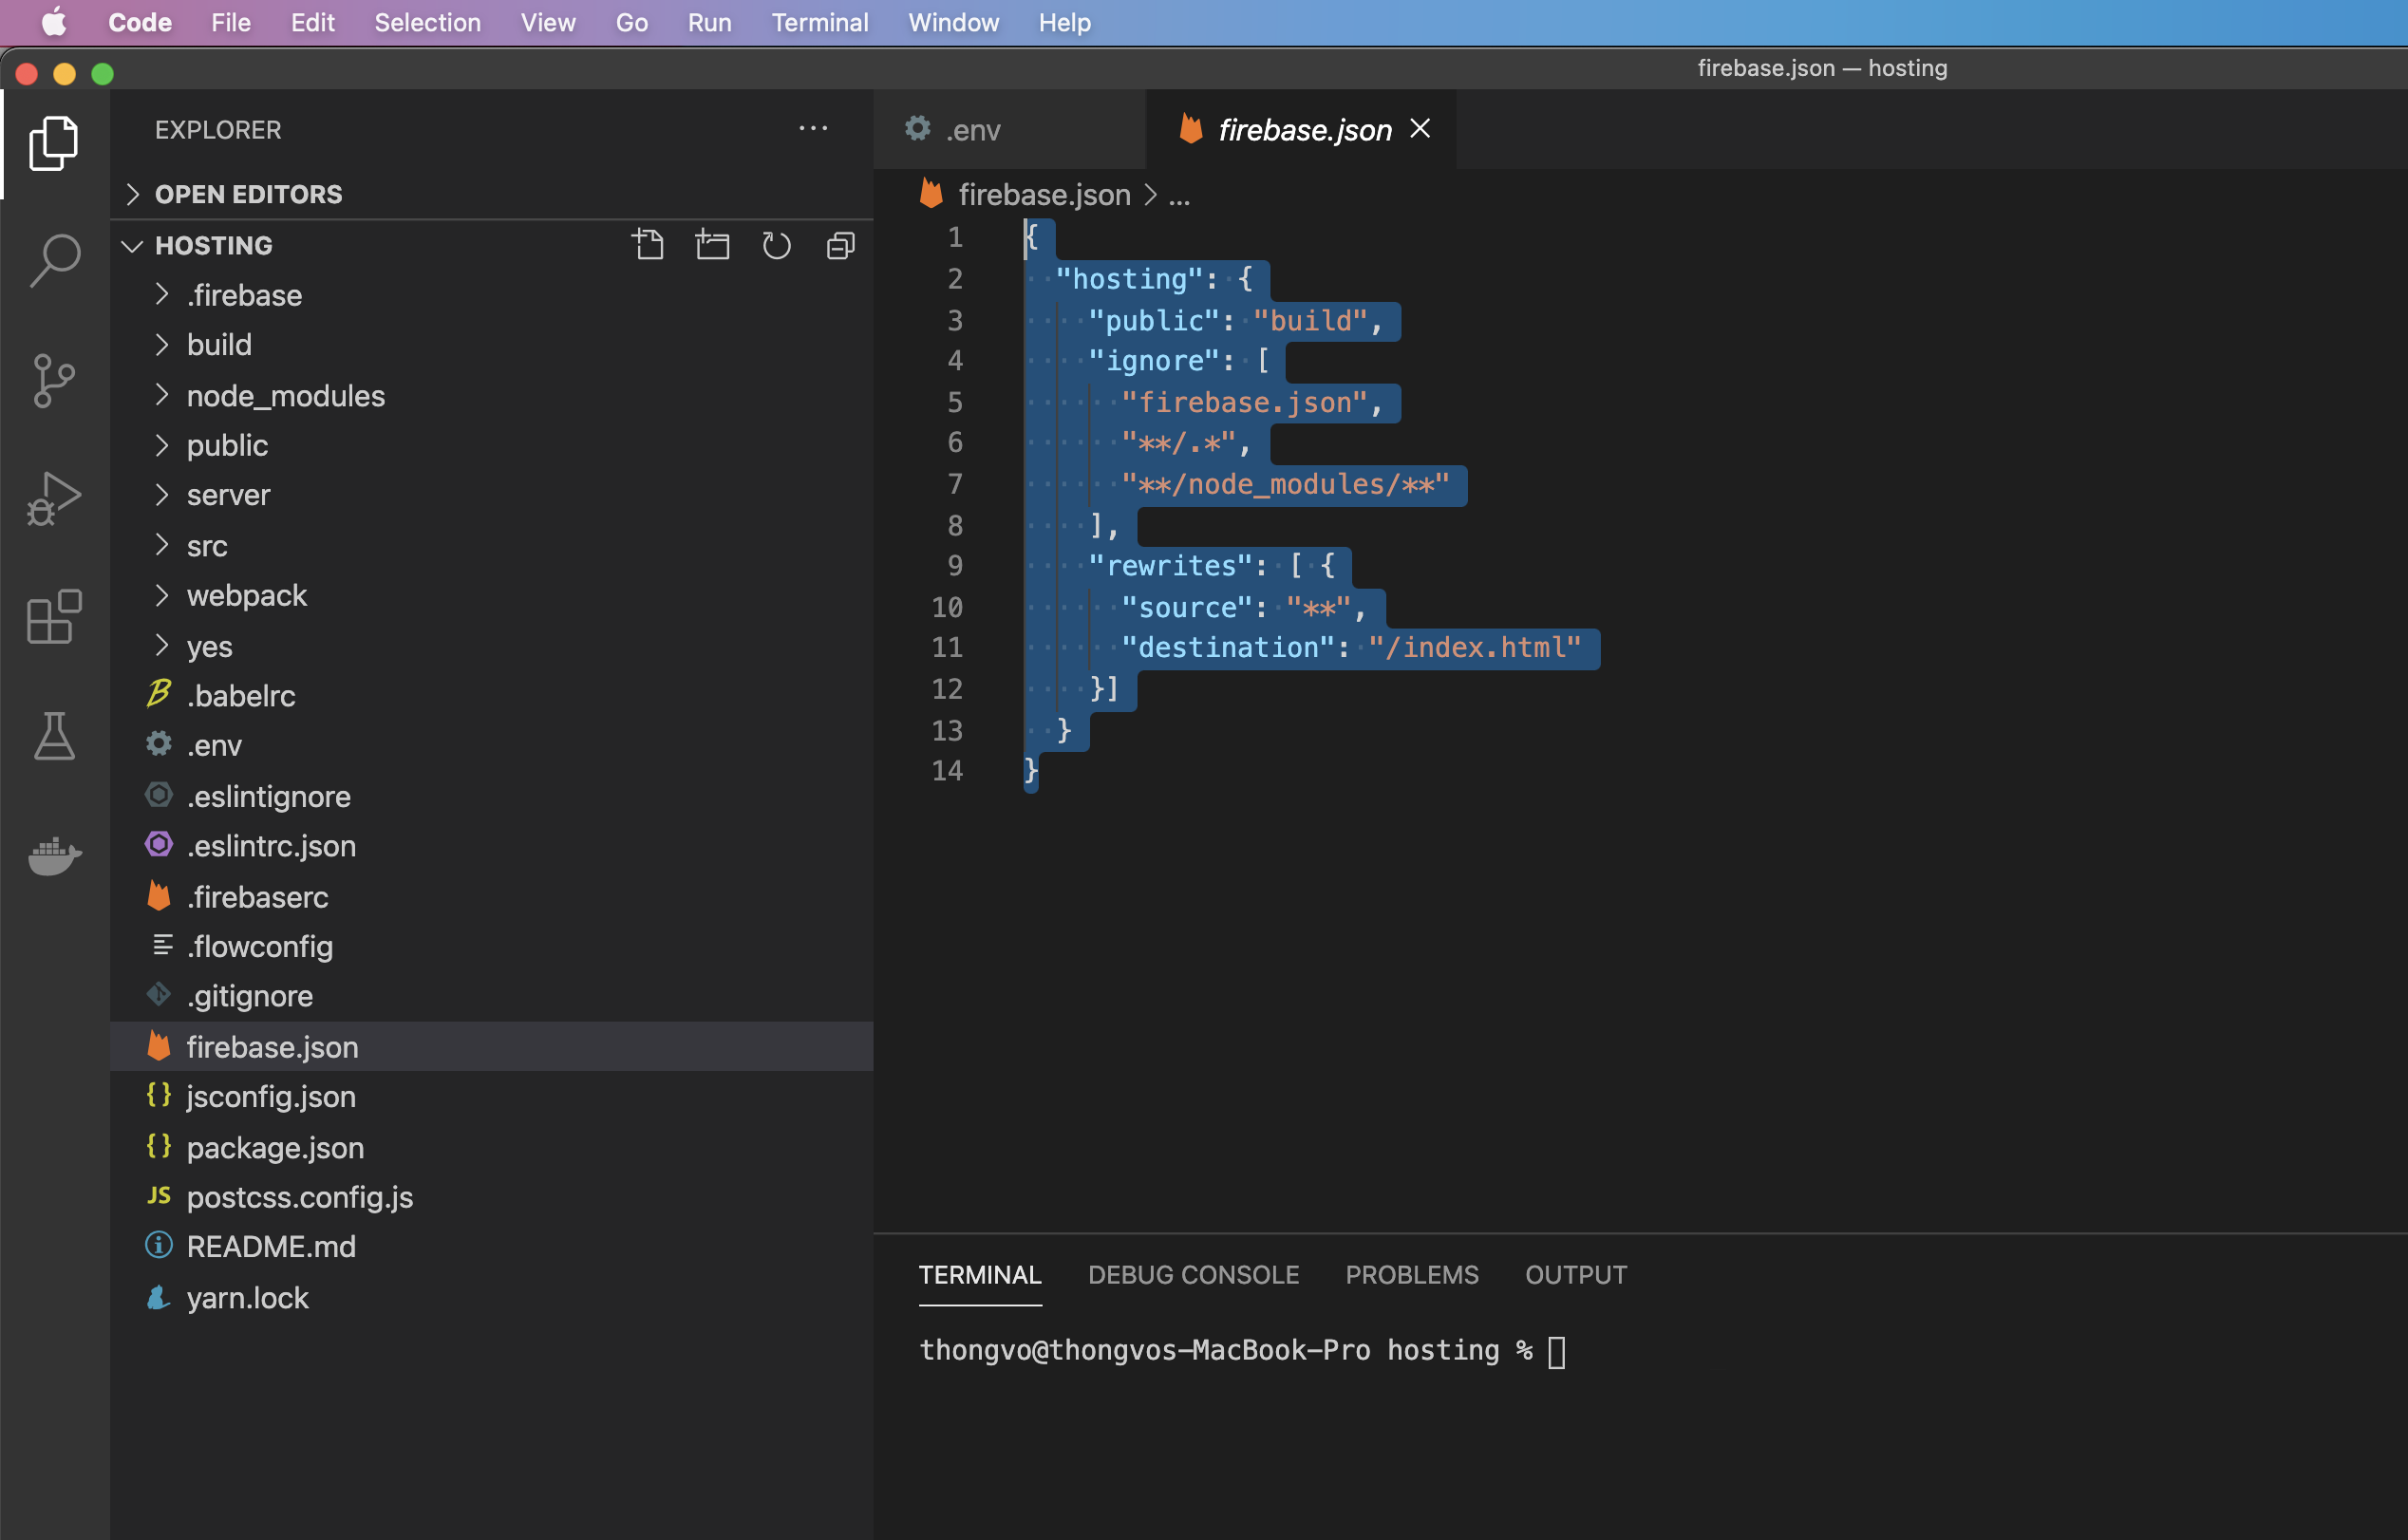
You normally don't need to edit it. If you do, change "public" to match your build output folder, or add custom "headers" for caching.
FAQ
For the full FAQ see FAQ.md. Quick answers below.
Do I need to be a developer?
Yes — basic developer skills (terminal, Firebase Console, signing apps). If not, hire a freelancer on Fiverr (~$30–80) and share the zip.
One Firebase project or two?
One. Android and Admin share the same Firestore collections (Servers, configs).
Can I change the package name / app ID?
Yes — edit buildSrc/src/main/kotlin/Config.kt → applicationId. You'll also need to register a new Android app in Firebase with the new package name and download a fresh google-services.json.
Billing Library version?
7.1.1. Meets Play's 7.0+ requirement (enforced since August 2025).
What's the OpenVPN license situation?
The bundled ovpn/ module is GPL-2.0. You can ship it in your closed-source app (this is how every commercial VPN on Play works). If you modify files inside ovpn/, those modifications must be open-sourced. Don't touch ovpn/ and you have nothing to worry about.
Android 14+ VPN stalls at "Connecting…" — known bug, 3-line fix
The bundled OpenVPN service predates Android 14's mandatory foregroundServiceType declaration, so startForeground() throws on API 34+ and the tunnel never finishes connecting. Android 13 and below unaffected.
Open 01-android-app/ovpn/src/main/AndroidManifest.xml and:
- Add
<uses-permission android:name="android.permission.FOREGROUND_SERVICE_SPECIAL_USE"/>near the other permissions. - On the
<service android:name=".core.OpenVPNService" ...>element add attributeandroid:foregroundServiceType="specialUse". - Inside that service element, add a
<property android:name="android.app.PROPERTY_SPECIAL_USE_FGS_SUBTYPE" android:value="VPN tunnel connection" />.
Rebuild. Connects normally afterwards. Full snippet in FAQ.md.
Troubleshooting
| Problem | Fix |
|---|---|
Android: SDK location not found | Re-run bash setup.sh in 01-android-app/, or create local.properties manually with sdk.dir=/path/to/Android/sdk. |
keytool: command not found | Install JDK 17: brew install --cask temurin@17 (macOS) or adoptium.net. |
| Admin: blank page / auth errors | Check .env uses Web app Firebase config, not Android. |
setAdminRole.ts: Could not load default credentials | serviceAccountKey.json missing at 02-admin-dashboard/ root. |
Windows: bash: command not found | Install Git for Windows, or double-click setup.bat. |
| Gradle download very slow | First build downloads ~500MB of dependencies. Subsequent builds are <1 min. |
| VPN stalls on Android 14+ | Bundled OpenVPN needs a foregroundServiceType declaration. 3-line fix in FAQ. |
| Play Console: "Disruptive Ads" rejection | Already fixed in this package (7-min frequency cap + premium gating). Submit an appeal citing those fixes. |
Licensing
Android app + Admin Dashboard — your CodeCanyon Regular License (single end-product) or Extended License (reusable across multiple end-products). Full terms at themeforest.net/licenses.
Bundled OpenVPN (01-android-app/ovpn/) — GPL-2.0. Mere aggregation in a closed-source app is allowed (this is standard for commercial VPNs). If you modify files inside the ovpn/ folder, those modifications must be available under GPL-2.0 on request. If you don't modify ovpn/, you have nothing extra to do.
Full license text: see 01-android-app/LICENSE and 02-admin-dashboard/LICENSE.
Support
Best channel is the CodeCanyon item comments page — replies within 24h on business days.
Please include:
- Your item order number (from the Envato receipt email)
- A screenshot of the error
- Which step you were on (link to this page's section, e.g.
#android) - Your OS +
node -v+java -versionoutput
Need custom work? Contact via the Envato profile on the item listing.